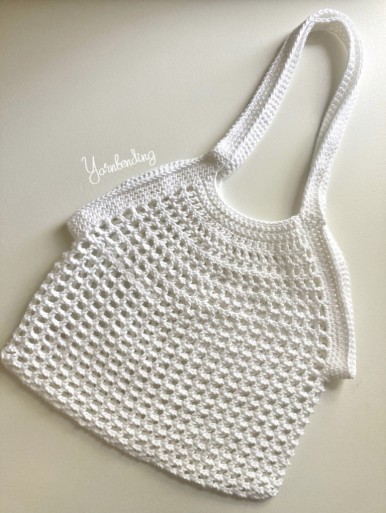
Small But Mighty Tote

This post contains affiliate links, if you decide to buy something from the links on this page, I may receive a small commission at no cost to you.
This small but mighty tote is perfect for those times you just need to carry small amounts of shopping. The net design allows it to expand and accommodate a surprising amount of items despite its small size. Using Coboo yarn by Lion Brand makes it very easy to wash and helps to limit bacterial growth.
You will need:
- Approx. 140 yards (128 meters) Cotton/ bamboo yarn (I used Lion Brand’s Coboo in White)
- G/4.25mm crochet hook (I used my favorite Ergonomic Boye Crochet Hook)
- Tapestry needle, to weave in ends
Finished size: 10 1/2″ wide by 9″ tall (not including handles).
Add this project to your Ravelry queue
Purchase the ad-free PDF on:
Ravelry – Buy Now
Ribblr – Buy Now
LoveCrafts – Buy Now
Notes on construction:
This bag is worked in the round for 14 rounds and then splits and is worked in rows. You will always be working into stitches that have double crochet stitches below.
Bottom of bag
ch 68,
Rnd 1: dc in 8th chain from hook, *ch 2 & skip 2 foundation chains, dc in next ch* repeat from *to* down the length of the chain. ch 2 and dc into the last chain. Turn the work and work into the opposite side of the foundation chain. Repeat the fillet pattern, working a double crochet in the same chains as the first round. Join with a sl-st to the 6th chain of the starting chain. You should have 44 grids.
Rnd 2: ch 5 (counts as double crochet + 2 chains), 1 double crochet in next double crochet, *chain 2, double crochet in the next st* repeat from *to* around, join with a slip stitch to the 3rd chain of the starting chain. (44 grids)
Rnds 3-14: Repeat Rnd 2.
You will now start working in rows and will work each side individually.
Side 1:
Row 1: ch 5 (counts as dc + ch 2), dc in next st, *chain 2, dc in next st* repeat from *to* 18 more times, turn (21 grids)
Row 2: ch 5 (counts as dc & ch 2), dc in next st, *ch 2, dc in next st* repeat from *to* across, turn (21 grids)
Rows 3 & 4: Repeat Row 2.
Row 5: ch 4 (counts as dc + ch 1), 1 dc in next st, *ch 1, dc in next st* repeat from *to* across, turn.
Rows 6-8: Repeat Row 5.
Row 9: ch 3, dc in each st across, turn.
Row 10: ch 1, sc in each st across, turn.
Rows 11-13: Repeat Row 10.
Fasten off.

Side 2:
With the right side facing you, reattach yarn to the opposite side of the net one grid away from side 1.
Repeat Rows 1-13.

Edge & Handles
After completing side 2, turn the work 90 degrees. You will now be working on the edges. Sc into the edge of the first 4 rows, followed by 3 sc in each grid down the side 2. 1 sc in the gap between sides. *Work 3 sc in each grid of side 1, and 1 sc in each of the 4 solid rows, ch 70* (first handle made), reattach to the opposite solid side with 1 sc in each st. Repeat from *to* (second handle made). Connect with a slip stitch to the first sc.
Rnd 2: Ch 1, sc in each st and chain stitch around, join to first st.
Rnds 3-5: Repeat Rnd 2.
Fasten off and weave in ends.


I hope you have enjoyed this pattern and if you did, be sure to follow the blog to be notified of any new patterns or posts. If you share photos of your finished totes on Instagram, be sure to tag me (@yarnbending), I would love to see them!


